|
“SPRING” Loaded Butterflies A Nancyfangles Whimsical Creation Re-design As a Mixed- Media Artist and Designer I find myself surrounded by inspiration almost everywhere I look. Most of the time that is… And other times, I cannot find a muse no matter how hard I look. That’s when I turn to Pinterest. I may have an idea or a theme in mind, but just need a little kick start of inspiration to get me moving. Such was the case today… I knew I wanted to do something for spring, but what I ended up creating was spring x2. A “Spring”- loaded Butterfly. The original design idea was by Rhubarb and Wren, who’s basic instructions were pretty plain, but also pretty awesome! It was just the spark I needed to ignite my imagination… I hope that I do the same for you. Inspiring you to be Artistic, but to also find your own Creative Magic. Here’s what you’ll need: A Sheet of 12×12 heavy card stock (one sheet makes 4 butterflies) * If you want to paint your design, or color with crayons, markers or colored pencils, use white. Decorative napkins or an additional sheet of decorative scrap book paper, as desired. A spring loaded clothespin (I used wooden and colorful plastic). A small piece of thin jewelry wire. A small bead. white paper glue, Mod Podge, and or glue dots or dashes. E6000 What to do: These instructions are for a scrap book paper butterfly, as I found them to be the easiest to create. Go here to find the butterfly template, or simply create your own… https://tinyurl.com/7e9vjksd Trace your butterfly template onto your thick card stock and cut out. Cut out two (approx.) ½ inch by 2 ½ inch rectangle strips out of your heavy card stock. Lay your card stock butterfly on your decorative scrap book paper (design up) and trace Lay your card stock butterfly on your decorative scrap book paper (design down) and trace Cut both out – do not mix up... Glue the design up copy to the top of your card stock butterfly and the design down copy to the bottom Using glue dots or dashes, adhere the body to the top of the clothespin, head side towards the opening. (I tried glue, but the glue dashes worked much better) Cover your two rectangle strips in the same decorative paper on one side as desired. Fold your wings up (away from the clothespin) where they meet the body. Using glue dots /dashes, glue one of the ends of the strip to the bottom of the clothespin and the other end to the folded wing. repeat on the other side. Bend the small piece of wire in half and curl the ends to form the antennae, glue to top of clip with e6000, allow to dry and glue a bead to the top. Squeeze your clothespin to make your butterfly, fly… Enjoy! 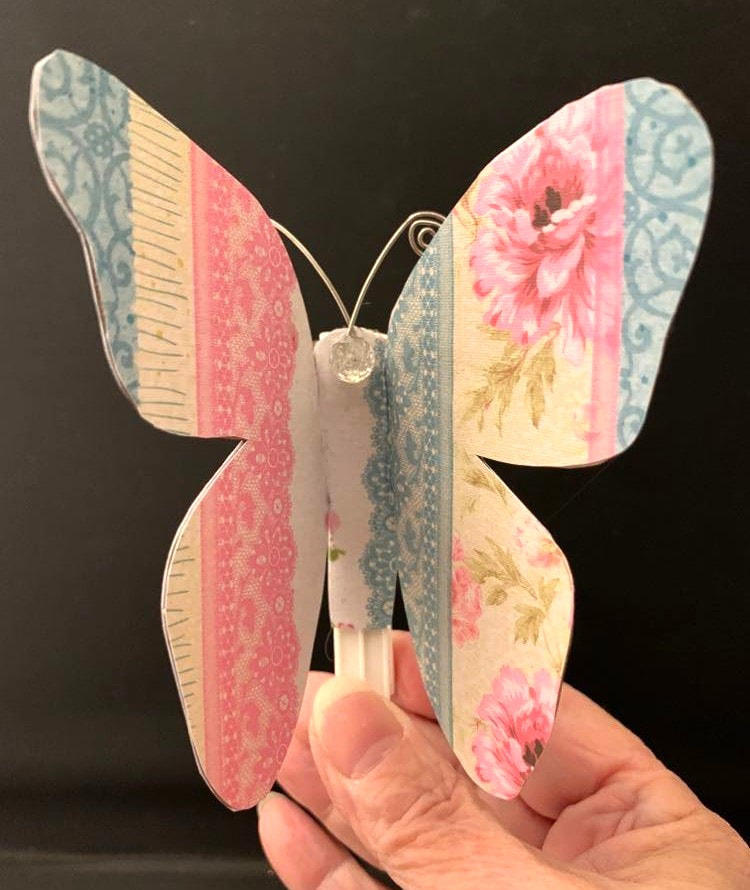
0 Comments
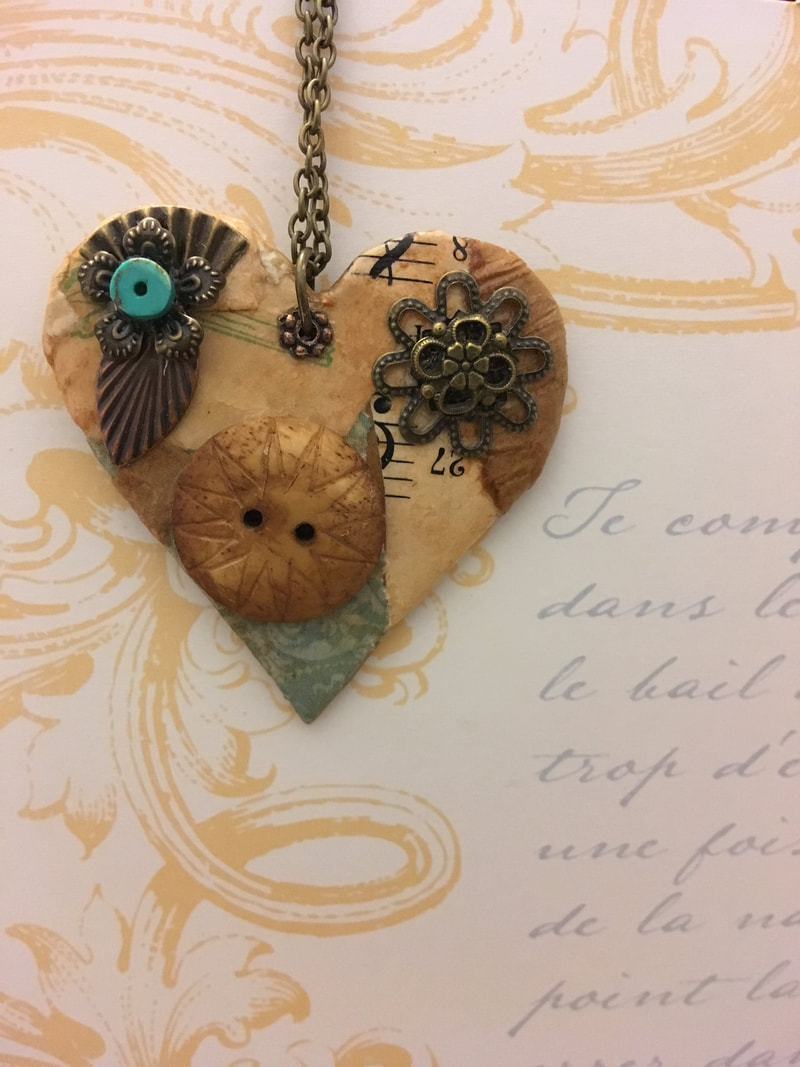
Mixed - Media Scrap Necklace
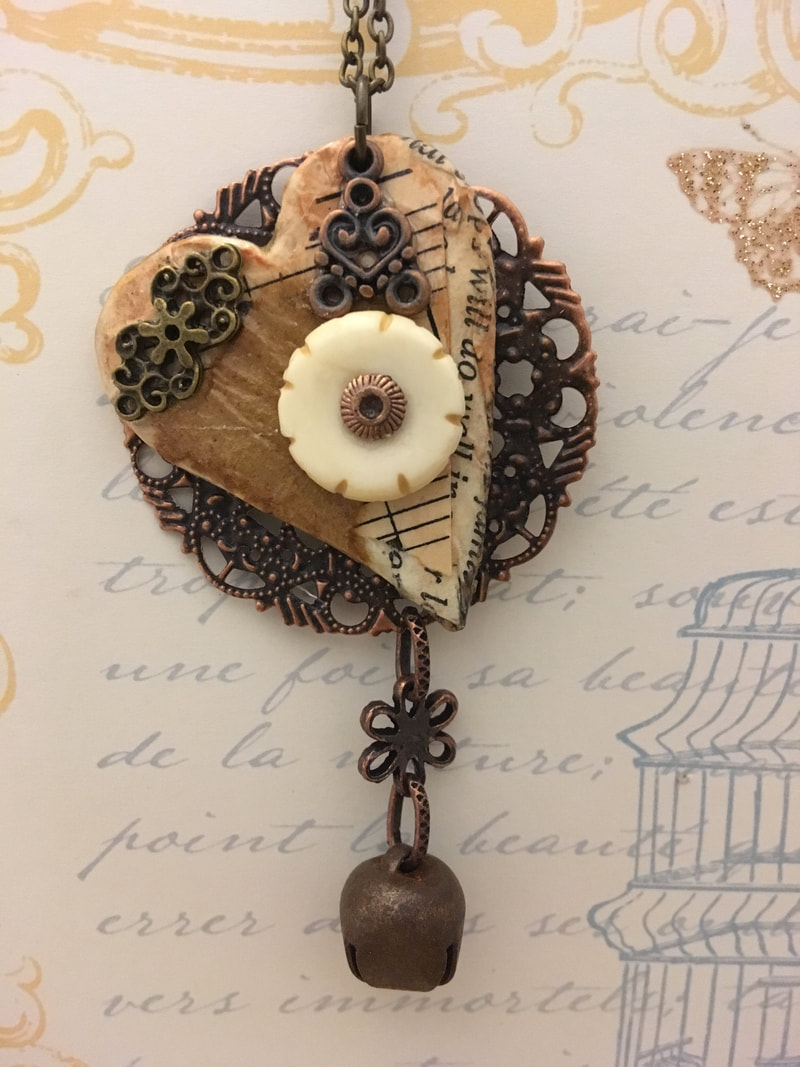
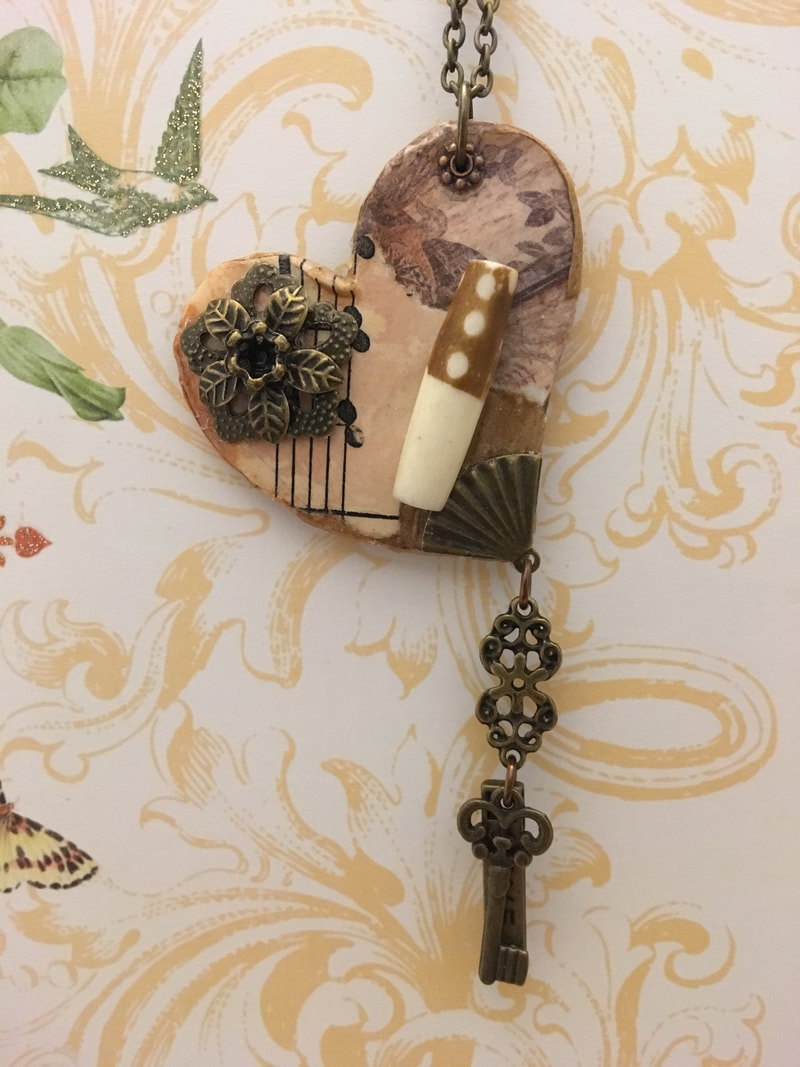
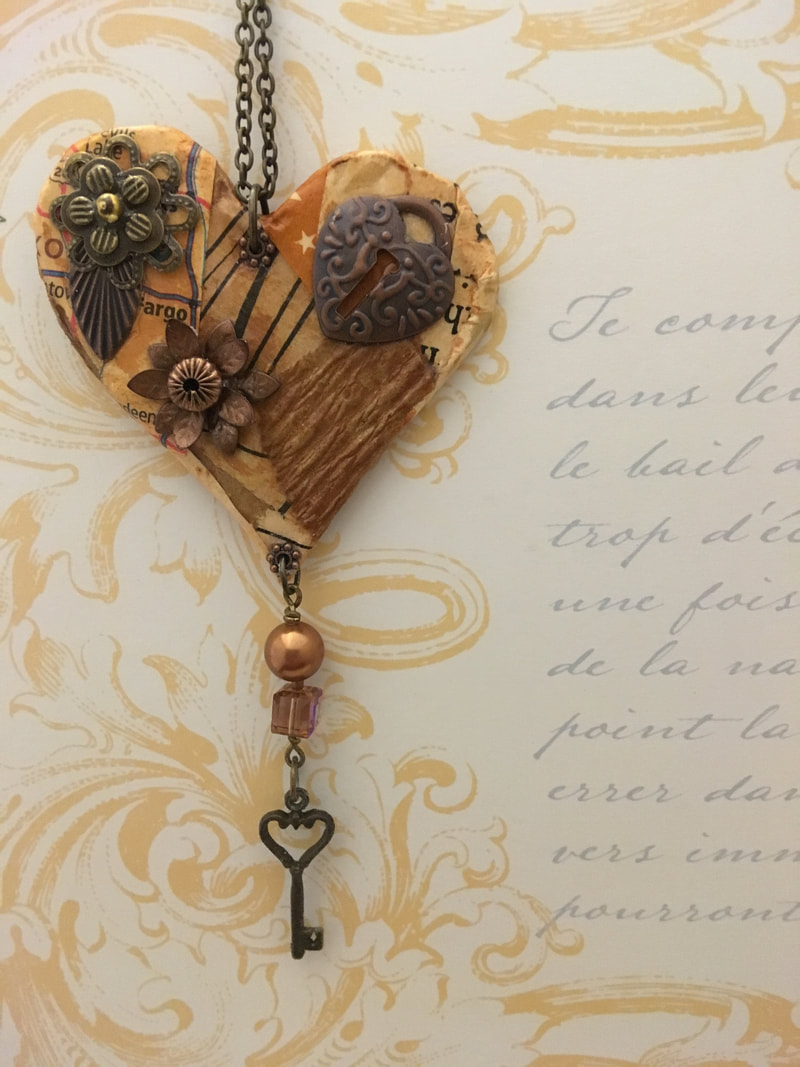
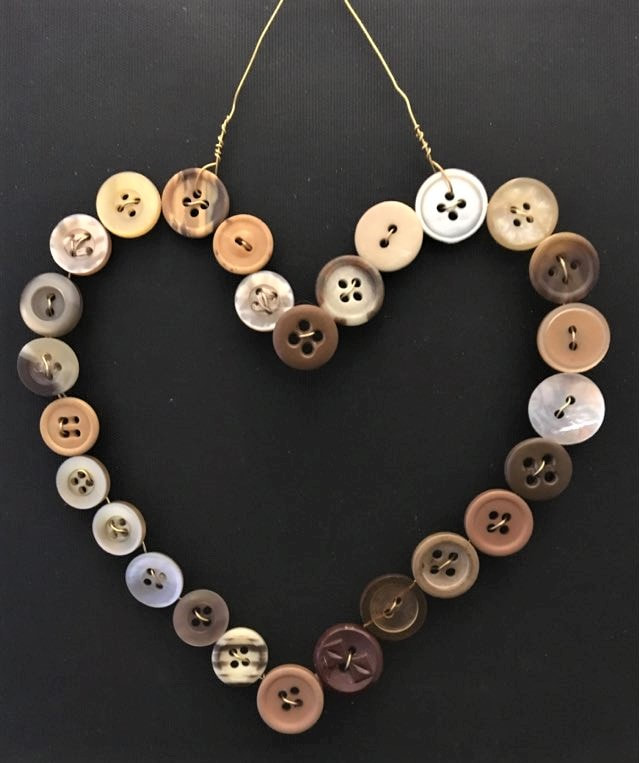
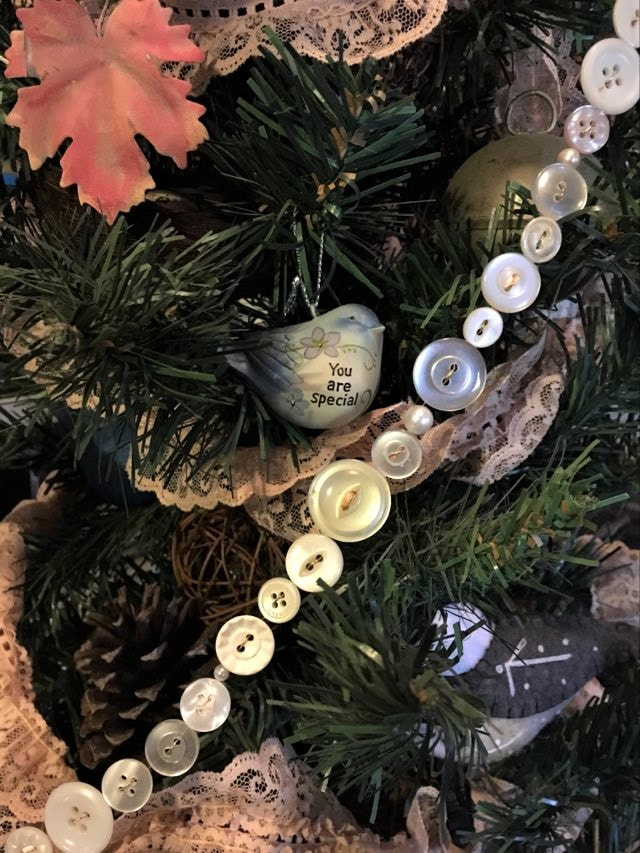
A Nancyfangles Whimsical Creation Every once in a while I like to go through my collection of scrap papers and see what I can come up with for a design idea. It’s amazing what you can do with pieces of paper that may have been otherwise discarded. When I found a few pieces of cardboard tucked into my stash, a light bulb went off and these necklaces were created as a result… Have some paper scraps lying around your house? Why not give it a try? Supplies: Thick cardboard (or just glue together a couple of thin pieces) Pieces of decorative scrap paper – you can use junk mail, old maps, paper bags… Modpodge A paint brush Scissors E6000 glue (always use in a well ventilated area) Assorted jewelry components to decorate - Beads, charms, buttons, bells, metal filigree/connector Jump ring(s), chain 2 pairs of flat nose pliers A finishing nail and hammer or awl to make the holes Technique: Cut cardboard into desired shape (I chose hearts) Glue bits of paper to your cardboard covering both sides and layering to add texture. Overlap around the sides to cover the cardboard. Allow to dry. Add several coats of Modpodge to each side allowing to totally dry in between coats. Poke a small hole to hang from, and another on the bottom if you wish to hang bead or charms from it. Using E6000, glue a decorative jewelry piece over the hole to hide it (I used small bead caps) be sure not to block the hole. Glue on any jewelry components to decorate, and allow to dry thoroughly. I glued a decorative filigree/connector to the back of one to add some interest and texture. Once jewelry components are dry, add a jump ring into the holes. Add decorative beads/baubles to the bottom as desired. Slide a chain through the hanging ring and wear. Imagine – Create – Enjoy! Vintage Button Ornament and Garland ~ A Nancyfangles Whimsical Creation
When contemplating my next Christmas Creation I was trying to think of something that everyone would already have in their home or could easily find in a thrift shop or craft retailer. Buttons came to mind… I thought I would try threading buttons on wire and then shaping it into an ornament. After figuring out the easiest way to do it, I created a heart to hang on the tree. I loved it so much that I decided to try a garland as well. For the garland I used buttons in shades of white and added pearl beads as an accent. I Love how they turned out and I hope that you do too! Supplies: Wire thin enough to fit through the button holes, I used 24 gauge. A selection of buttons in mixed or similar colors. Wire cutters. Technique: Cut a piece of wire long enough to bend into a shape. Leave about a two inch length of wire on one end and thread the long end up through the bottom of the button and then back out through the front. Pull the wire tightly. Thread the long end up through the next button and pull the button down until it touches the first one. Thread the wire back through the front and out the back of the second button, pulling tightly to keep the buttons close together. Continue this process until you get the desired length. Make sure to save an inch or two on the end. The hardest part is keeping the wire from twisting while pulling it tightly. I also found it easiest to hold the short end closest to me and work out away from myself (hope that makes sense). When you reach the desired length, bend the wire into the shape you desire. If you are forming a heart, tightly twist the two ends together to form the point. Twist another small piece of wire onto your ornament to use as the hanger. You can create shapes, or even letters, be creative and use your imagination… *For the garland I used the same technique but added in some pearl beads, and formed hooks on each end of the wire to hang. ⭐A Star Spangled Banner⭐
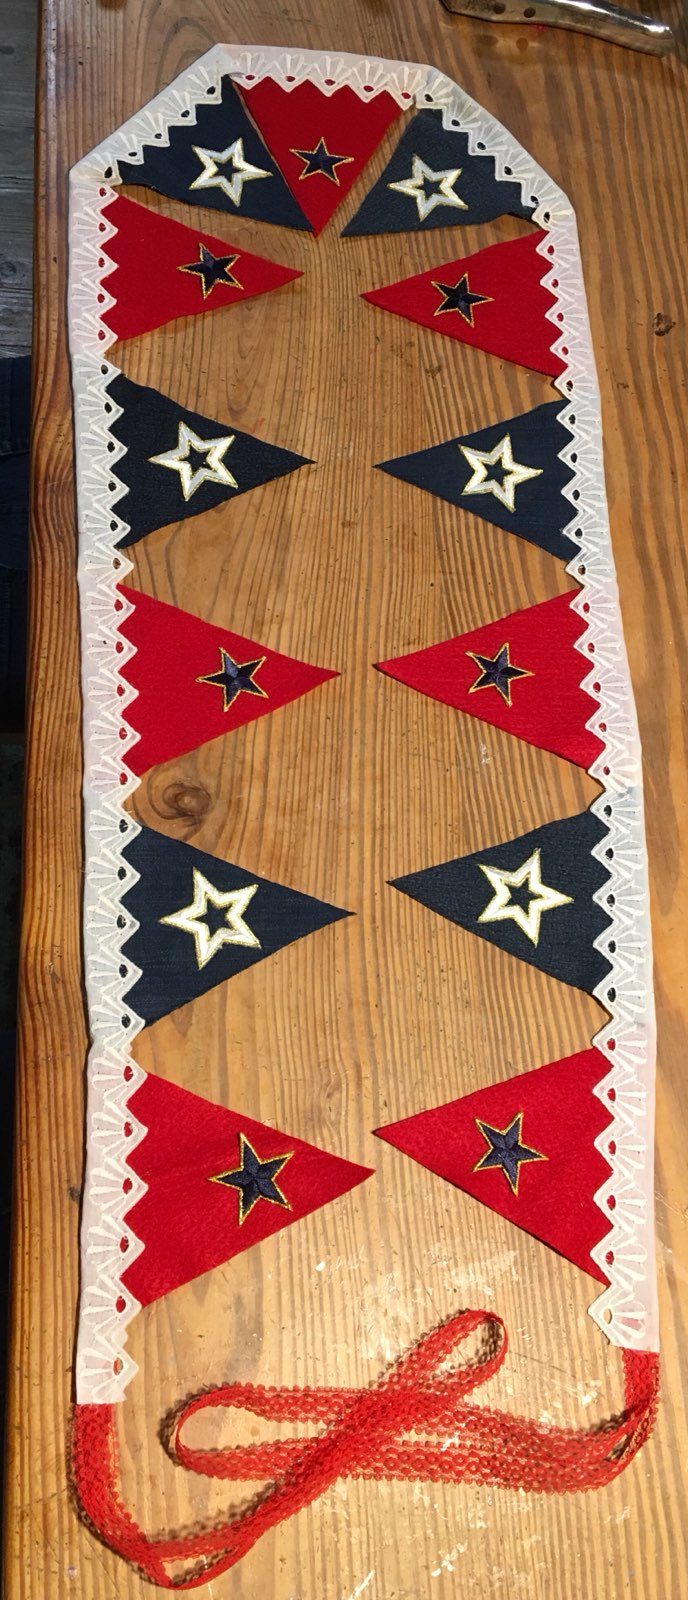
I recently recovered some chairs in my home and wanted to do something “fun” so I decided to cover my seats, with the seats from old pairs of jeans. I love how the chairs turned out, and when I was finished I was left with 4 denim legs. Since they were dark, denim blue, I decided I would use them to create something for the Fourth of July. The design really came together when I visited a local thrift shop and found some red felt and fabric star patches. This Star Spangled Banner is one of two patriotic designs I created for your Fourth of July décor… Supplies: Blue Denim fabric Red felt White triangular trim (you can use whatever wide, white lace you have on hand) Star patches (cut outs) Two pieces of red lace Hot glue gun and glue Scissors Cardboard White glue Instructions: Cut a triangle pattern out of cardboard. My triangles are 6 inches long from top to point and 5 inches wide at the top. Trace the triangle pattern onto your fabric and cut out as many as you like. I cut out 13 triangles, 7 red felt and 6 denim and created a 6 foot banner. Fold the lace in half lengthwise (iron) and glue the top of each triangle side by side, to the back of the lace. Fold over the front of the lace and glue to the front of the triangle. Glue on stars. Run a thin line of white glue along the back edges of the denim triangles to keep from fraying. Fold the two pieces of red lace in half to form a loop and glue one to each end of the white lace to hang. Hang and enjoy! 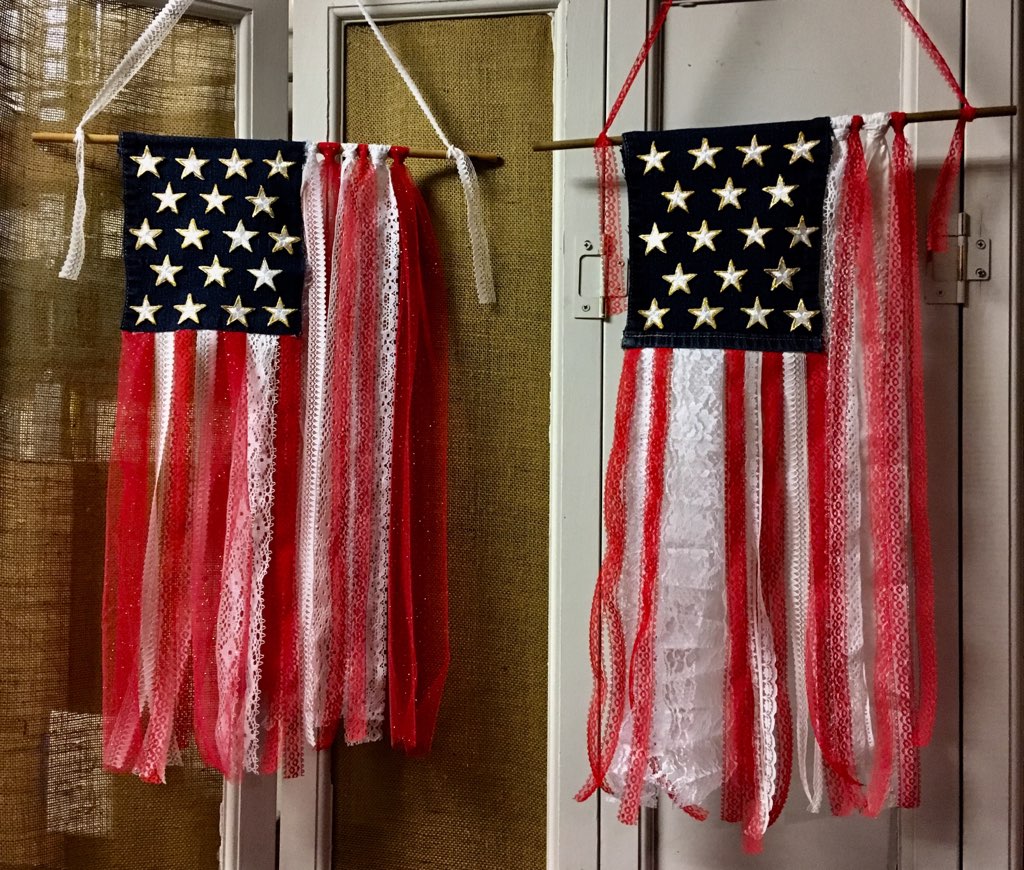 ⭐Old Glory⭐
Denim and lace - fabric flag These fabric flags are a great way to use up scraps of denim fabric and left over pieces of lace or ribbon and they are easy to create. I used different widths of lace in red and white. 7 red and 6 white. I used hot glue to attach the lace to the denim, but you could machine or hand stitch them as well. Let me tell you how… Supplies: One rectangle of denim (approx. 11”x 8”) 4 pieces of red ribbon 32 inches long 3 pieces of red ribbon 48 inches long 3 pieces of white lace 32 inches long 3 pieces of white lace 48 inches long 1 piece of white lace approx. 35 inches long (for hanging) 1 piece of white lace 8 inches long Hot glue gun and glue Fabric star patches or cut out stars (I used 18 because they fit nicely) Directions: Start by folding the denim over the dowel (approx. 3 inches, leaving an 8”x 8” square) and glue it to itself. Fold one of the 32 inch pieces of red lace in half and glue the folded part to the bottom, back of the denim vertically and even with the outside edge. Fold one of the 32 inch pieces of white lace in half and glue beside the red one… Repeat this process until you have the 4 red and 3 white 32 inch pieces glued vertically from the bottom of the denim square. Glue the 8 inch piece of white lace across the bottom of the denim to cover the glued part of the vertical pieces of lace that you just attached. Fold a 48 inch white piece of lace in half to form a loop, loop it back around the dowel and bring the ends through. Pull to tighten. Repeat until you have 3 white and 3 red 48 inch pieces attached. Fold the 35 inch piece of white lace in half and form a loop, tie a knot at the top of the loop to hang it from. Tie one end of the same piece of lace to one side of the dowel and the other end to the other side of the dowel, (be sure it is even on both sides) allow some extra to hang down from the knots. Glue on the stars. Hang and enjoy! 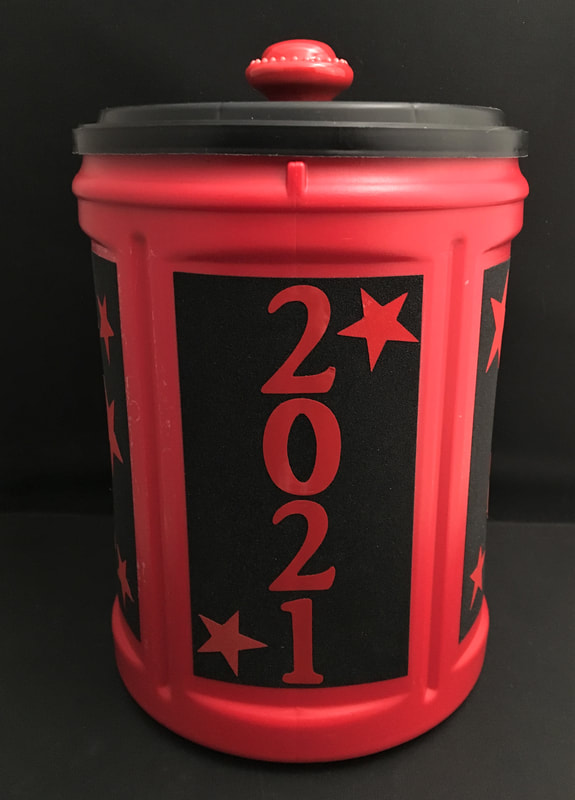 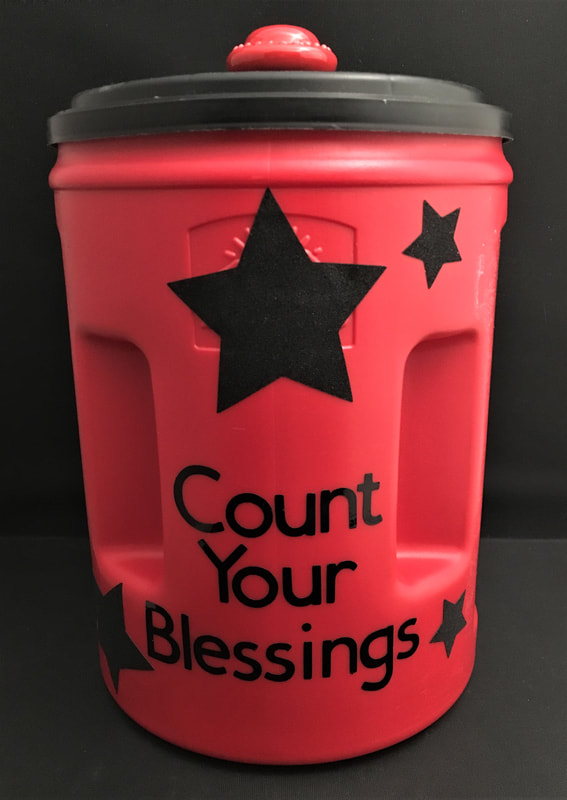 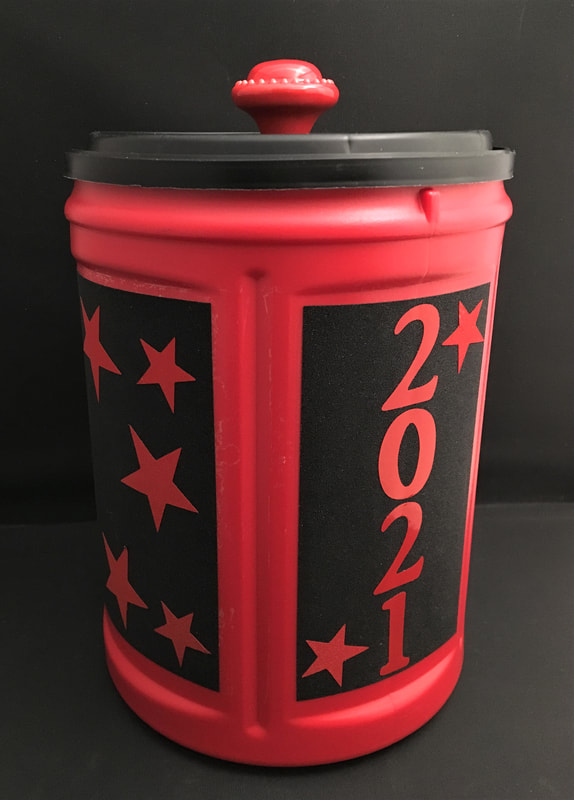 ~ Count Your Blessings ~
Welcoming the New Year 2021 We all know what an unusual year 2020 was, so rather than relive the past year I prefer to look forward to a New Year full of big blessings and pleasant possibilities. When I was trying to figure out what I would make for the new year’s column I wasn’t sure exactly what I wanted to create, but I knew I wanted it to be something that would help us focus on the good things that the new year has to offer. The surprises that we meet along the way, the blessings we receive and the memories we share. Together with my family we all came up with our own little piece of this creation. A Blessing Box. I hope you will enjoy creating one of your own, that you will use it and that it will help you to realize that no matter how things look there are always blessings to be found in the smallest of gifts, be it a smile, a beautiful bird, a kind word, or an extra hour of sleep. May you have a Happy, Healthy New Year filled with love. Supplies: A coffee can, a shoe box, a cookie tin, any container with a lid Paper, fabric, paint Stencils, stickers, markers A cabinet knob, a large washer, a bolt Instructions: Have Fun- Clean your container and dry thoroughly Cut out paper, fabric or vinyl to cover the labels, or paint the container Cut out the number 2021, stars, rainbows? Make it festive… Attach them to the container Carefully push the screw of the cabinet knob through the top of the lid Bring it through a large washer (to prevent it from pulling back up through the lid) And bolt it on - Anytime something good happens in 2021, jot it down on a piece of paper and put it in the box. But don’t wait until the end of the year to look at them! Any time you’re feeling low or you just need a smile, pick a blessing or two and read them! May your Blessing Overflow this Year ♥ Mini Pumpkin Pail Makeover
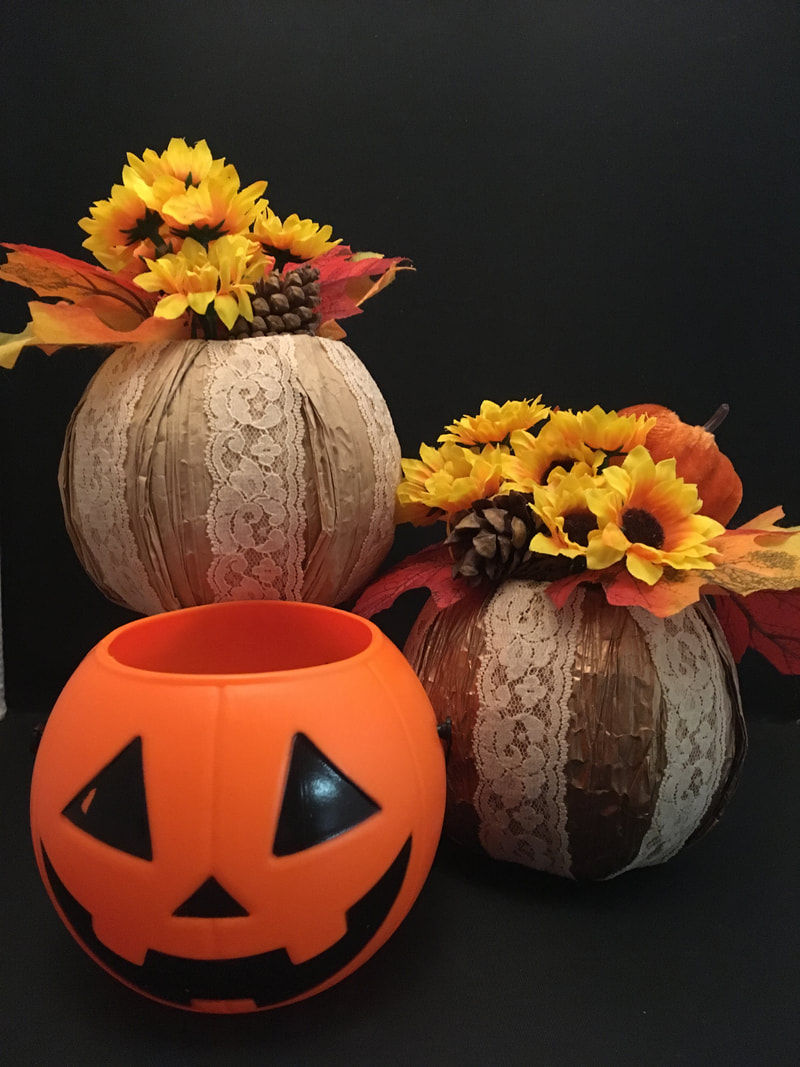
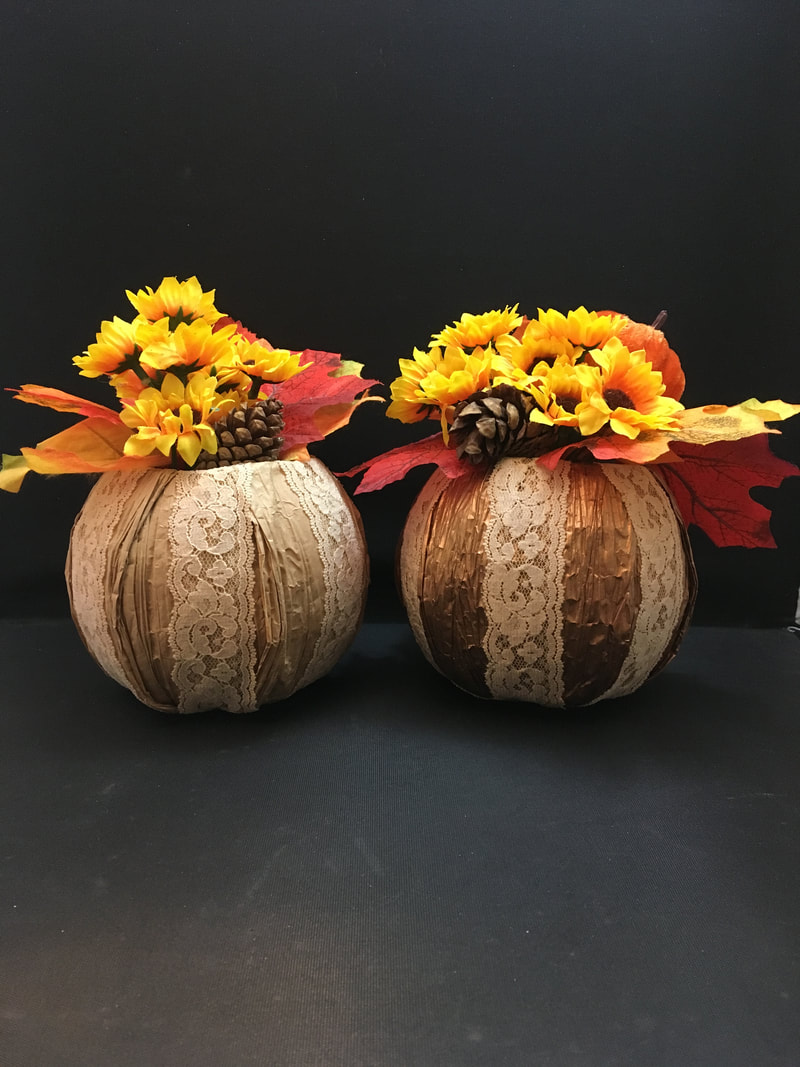
A Nancyfangles Whimsical Creation Who wouldn’t like a fall décor project that’s easy to make, inexpensive to buy and cute as can be? Believe it or not, these little pumpkin centerpieces started out as orange, plastic, mini jack-o-lantern treat buckets! A little paper ribbon and lace, some dollar tree foliage and pinecones and a little imagination transformed them into these mini fall centerpieces that you can use right through Thanksgiving. Let me tell you how... Supplies: Mini treat bucket (you can get them at Walmart for 76cents) Pinecones Small piece of floral foam Paper ribbon Lace Silk foliage Glue dots E6000 glue Cut 3 pieces of paper ribbon long enough to wrap around the pail from top to top, leaving a few inches to tuck inside at the top on either side. Untwist the paper ribbon but leave a small gather on each side. Put two glue dots on one end of the paper ribbon, tuck inside and attach to the inside of the pail. Tightly pull the ribbon down the side, underneath and back up to the top of the pail, tuck in and attach with glue dots. Repeat two more times over-lapping the sides of each piece of paper ribbon, onto the previous one. Repeat the same steps with the lace, using one glue dot on each end, and running the lace down the center of each piece of paper ribbon. Using E6000, glue the floral foam into the bottom of the pumpkin and let dry Poke foliage into the foam and glue the pine cone to the inside, front of the pail. That’s it -easy as pie! *Family Fun Flameless Fireworks* Present your Patriotic Pride with a “POP” The whole family can get in on the action with these flame-less DIY fireworks. A fun recycled project for star spangled crafters of all ages. Supplies: Empty toilet tissue or paper towel roll An 11 inch balloon Scissors Scrap paper, junk mail, gift wrap Heavy duty tape Double sided tape for decorating Paper punch (I used a star punch) or Confetti (if you prefer not to make your own) Instructions: Building your “Popper” Tie a knot towards the neck of your balloon. Cut about 1/3 of the rounded end of the balloon off and discard. Stretch the knotted end of the balloon over one end of the cardboard roll and tape to secure. Confetti: Punch shapes out of scrap paper, junk mail or gift wrap...any paper product will work. I used junk mail envelopes and pieces of left over paper from other craft projects including a gift bag. Feel free to skip this step and buy confetti if you wish. Decorate: We used pieces of scrap paper including some of the strips we punched the confetti out of. Double sided tape was the easiest adhesive to use as you do not have to wait for dry time. Decorate as desired, we used stamps and confetti pieces to decorate ours with a patriotic theme. Hold roll up-right with balloon end down. Drop confetti loosely into the roll. Do not over-pack. Firmly grasp roll and hold at about a 45 degree angle, aiming away from faces. Draw back the knot and let it go! Refill and Repeat! Decorate differently for other occasions and make your party “POP” Warning: Balloon pieces can be a choking hazard for small children and animals. Discard any cut or broken pieces at once. Do not let children put balloons in their mouths or leave children unattended with uninflated balloons.., 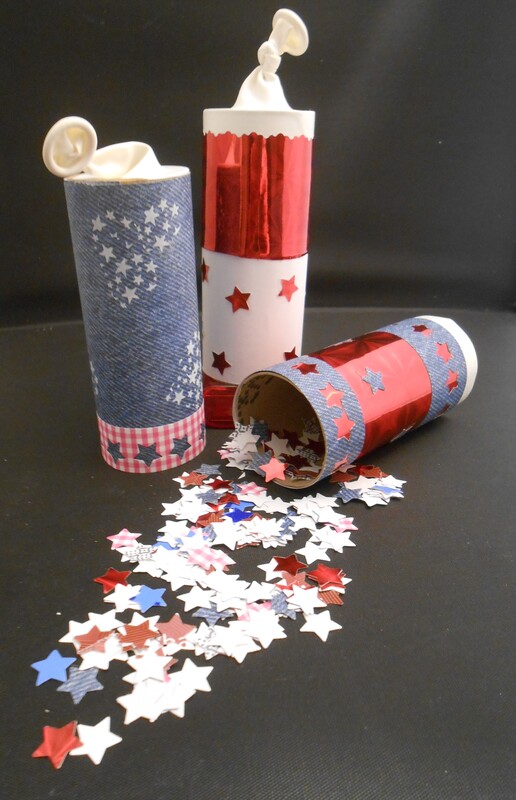 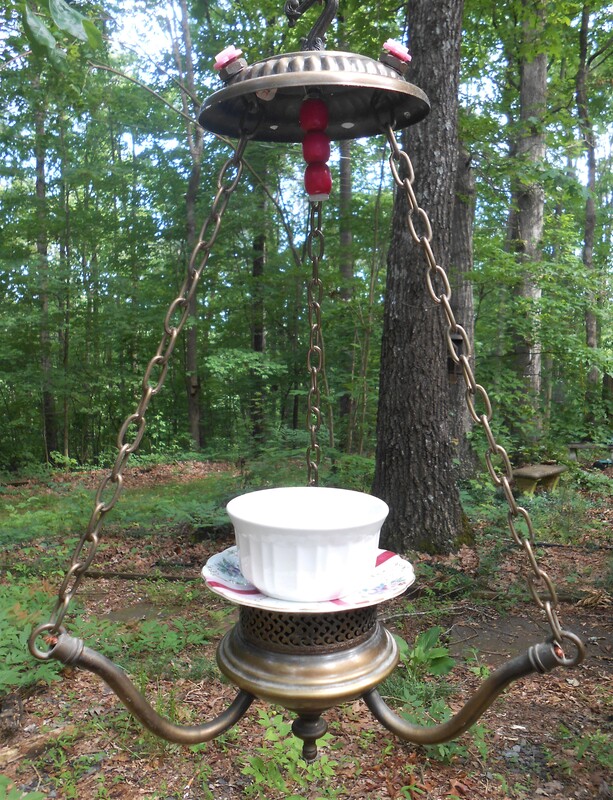 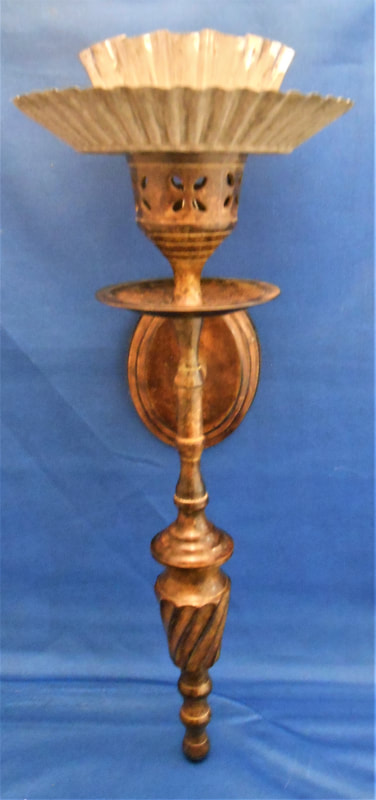 Summer will soon be here and I think everyone is looking forward to getting out into their yards and gardens, including our fine feathered friends. I wanted to make some unique bird feeders and since I haven’t had the pleasure of “thrift”therapy in quite sometime, I decided to see what kind of treasures I had stashed away in my collection. When I came across these metal fixtures a "light bulb" went off in my head, and I knew what I would create.
I will walk you through the process of how I created mine, but how you make yours will depend on what supplies you have. Look around your house and see what treasures you may have to work with... Happy Creating! Wall Sconce Bird Feeder Supplies: A wall sconce (Any wall sconce will do, it can be one that had an electric light or a candle) A mini pie pan A vintage Jell-O mold or baking tin E6000 Instructions: Clean all of your components to remove soils and oils. Mine had a light so I cut off the wires and snipped off the bulb holder I glued the Jell-O mold to the center of the pie pan and allowed it to dry I then glued the pie pan to the sconce, and allowed it to dry Hang from your favorite garden gate or tree, fill with bird food and enjoy! Vintage Light Fixture Bird Feeder Supplies: Vintage light fixture Saucer Desert Dish Buttons and beads Hanging hardware E6000 Instructions: Clean all of your components to remove soils and oils Remove all electrical wiring I removed the hardware and turned the top of the fixture upside down to use as a roof I glued the desert cup to the center of the saucer and set aside to dry I attached the hanging hardware, and covered up my mechanics by screwing and gluing on beads I also covered the top hardware with buttons I glued the saucer to the light fixture and allowed to dry thoroughly Now it is ready to fill and enjoy! I hope these will inspire you to create your own whimsical bird feeder... 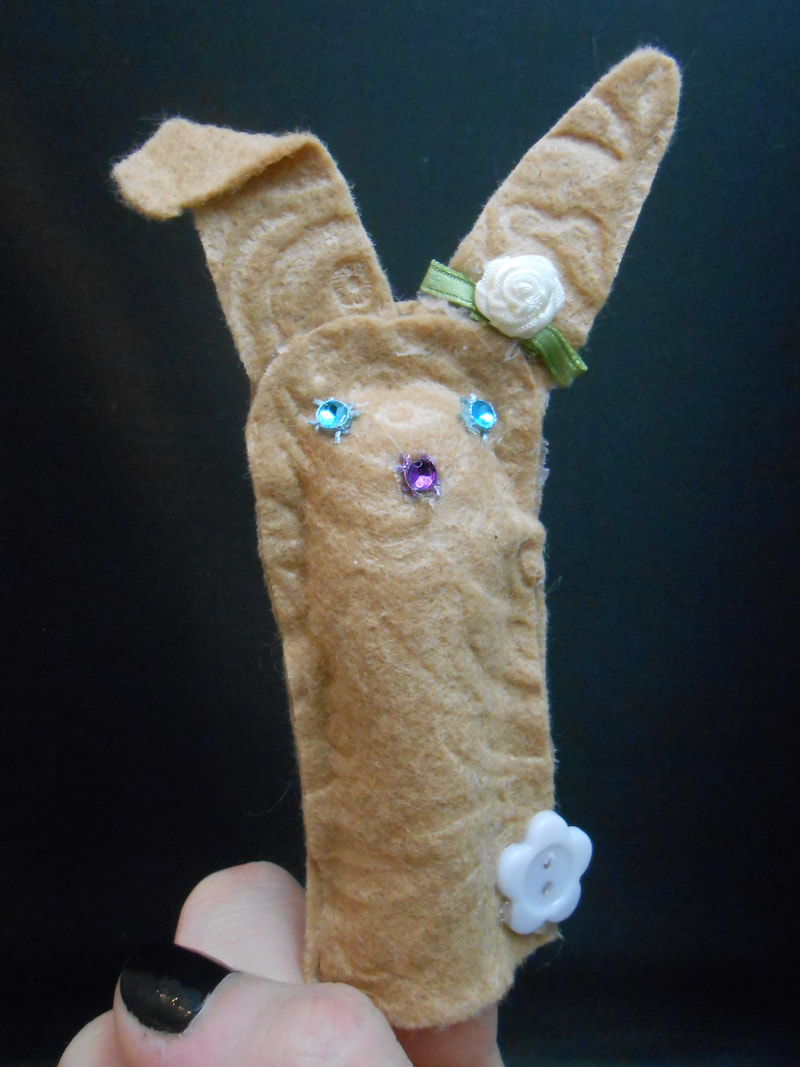 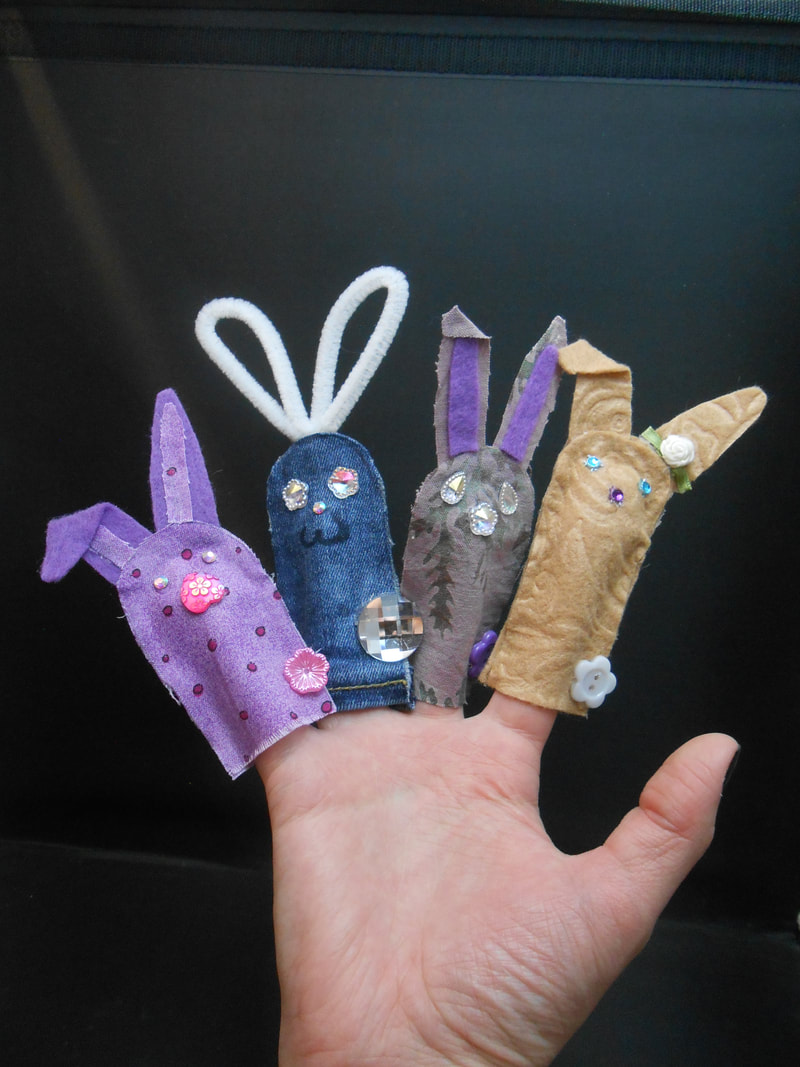 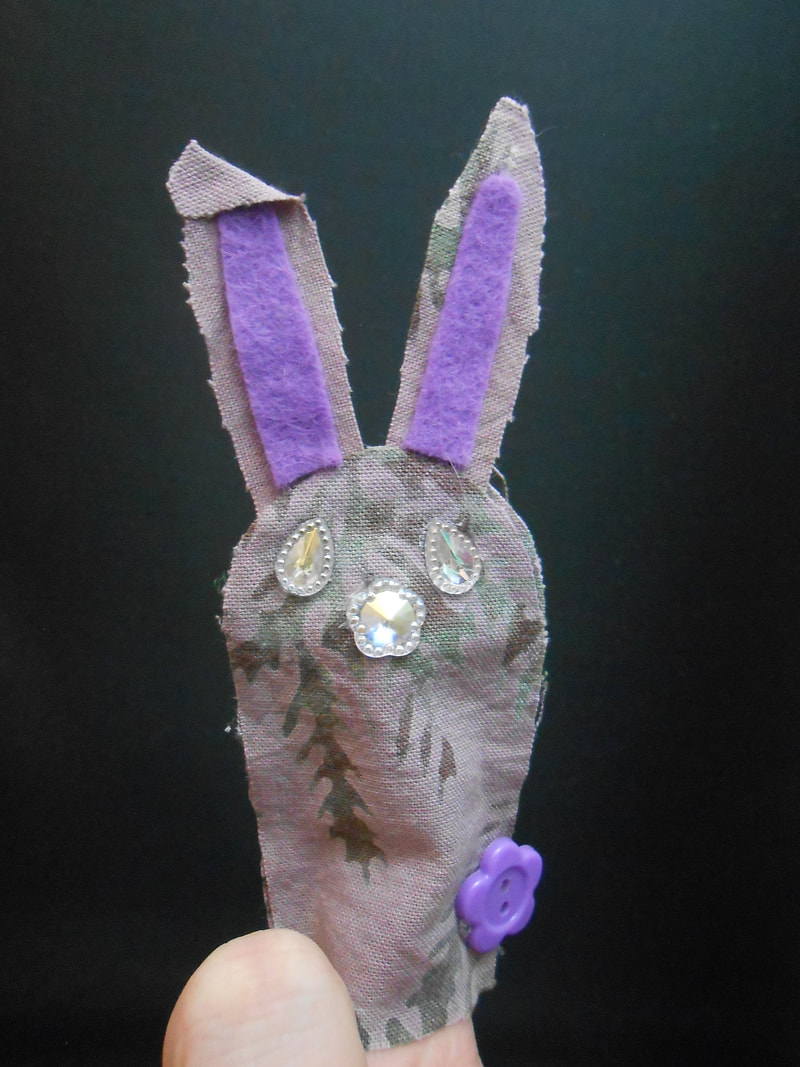  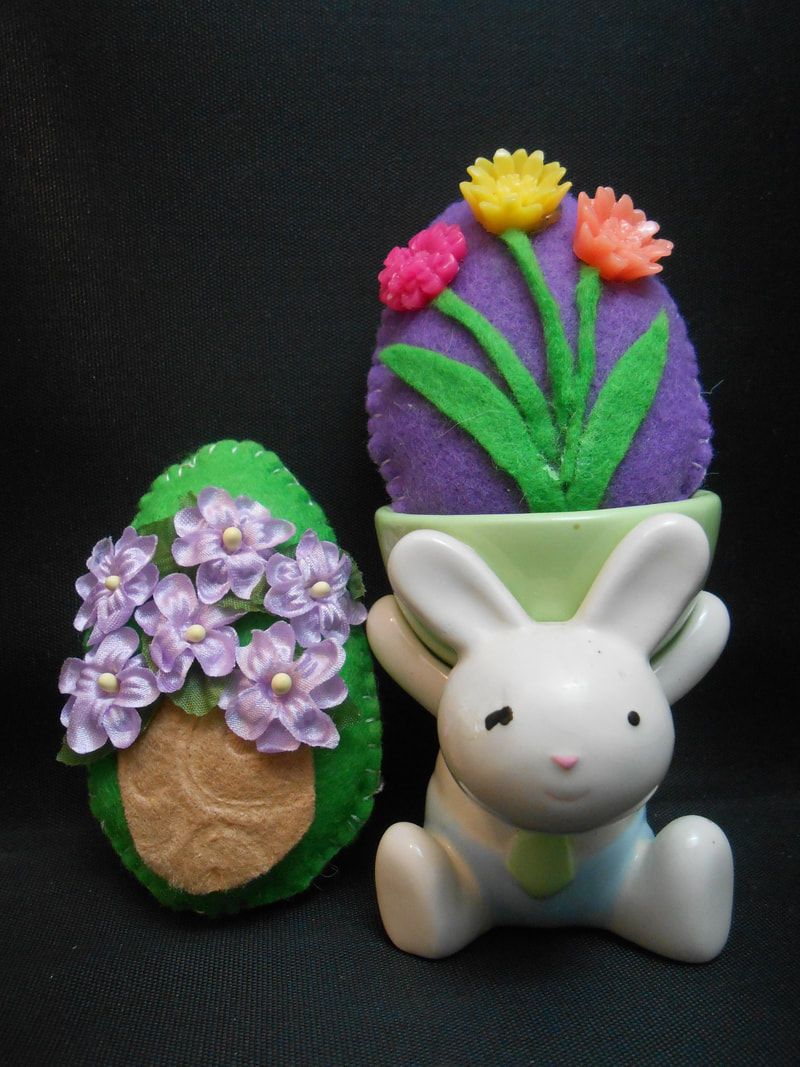 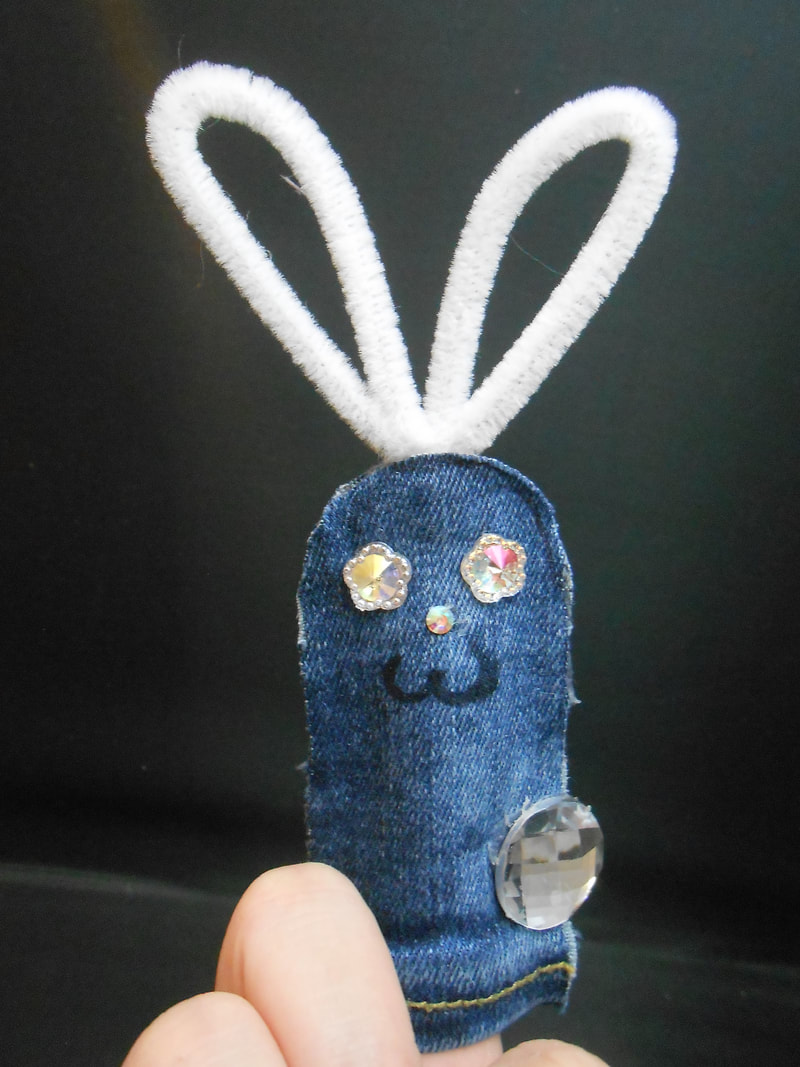 Quick and Easy -DIY-Bunny Finger Puppets
These little bunny friends are made of scrap fabrics and embellishments you may have on hand. Grab the supplies and the kids and have a little Creative Easter Fun... Supplies: Any scrap fabrics available... I used felt, denim and cotton prints Hot glue gun/ glue(for parental use only please!) Embellishment mix such as buttons, sequins, pipe cleaners, sharpie markers Technique: Measure around your child’s finger leaving a large seam allowance on both sides and on top Use the pattern to cut out two identical pieces of fabric, a front and a back piece Cut out ears from fabric, or use pipe cleaners bent into ears Using the glue gun, glue the bottom of the ears onto the inside top, of the back fabric piece Run a line of glue over the front bottom of ears and down one side of the back piece of fabric Line up the front piece of fabric and stick to the back piece where you just ran the glue Repeat on the other side to finish bunny body This is where the kids come in: Create Funny Bunny faces using buttons, embellishments and fabric scraps, Let Mom or Dad do the gluing!Have a Hoppy Easter Stuffed Fabric Easter Eggs After making the Bunny Finger Puppets, I had left over fabric scraps and decided to play. I came up with these cute little Stuffed Fabric Easter Eggs, and wanted to share them too! Supplies: Fabric Needle and thread (optional) Stuffing/fabric scraps Embellishments/fabric scraps Hot glue gun/ glue(for parental use only please!) Technique: Draw an egg pattern onto fabric and cut out 2 identical pieces Design a pattern with fabric pieces and/or embellishments and glue(or sew)them onto the front piece of the fabric Sew around the edges and top leaving the bottom open for stuffing. Stuff, and then sew the bottom closed Instead of sewing, you can glue your egg together the same way you did the Bunny Puppets, but I like the stitching effect around the edges. This is a Great opportunity to Create with your family! Stay Safe, Stay Home and Have a Happy Easter🐇 |
Archives
September 2023
Categories |
Nancyfangles


 RSS Feed
To book me for your upcoming event, or for more information about me and my art Work, contact me!
A response can be expected within 48 Hours of initial inquiry.