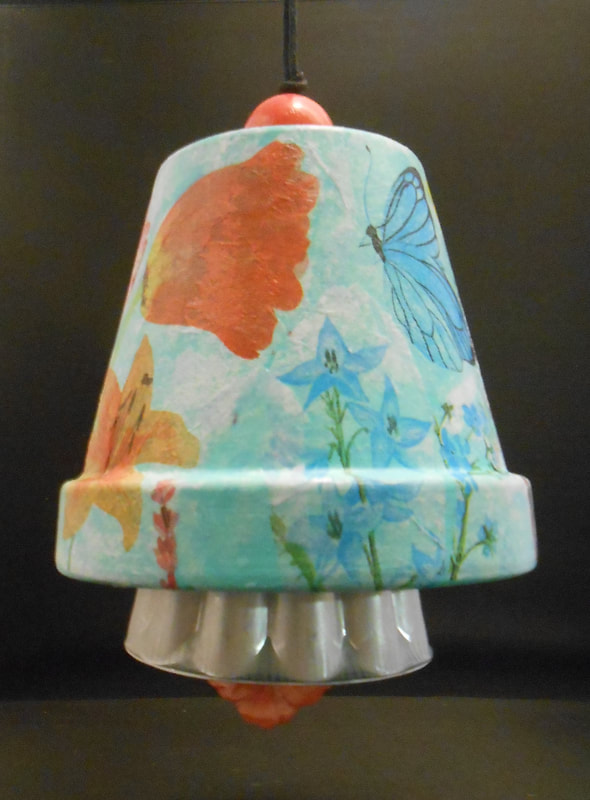
 Terracotta Bell ~or~ Spring Ding-a-ling
A Nancyfangles Whimsical Creation I know that I have mentioned the versatility of Terracotta pots on several occasions. This design is sure to get you seeing things from another perspective...Upside-down that is! This terracotta bell will add a touch of whimsy to an outdoor garden space, a porch, a patio or even indoors. You can decorate it with a garden motif, something fabulous for fall, or a charming Christmas design... Supplies: Terracotta pot (I used a mid-sized pot, but wouldn’t a tiny-terracotta bell be so cute?!) Decoupage supplies* Along piece of strong cording, twine, yarn... (Better to be too long, than too short) A vintage Jell-O-mold or similar 2 beads, one large for top, one medium for inside Some kind of flat piece to use as the clapper (I used a decorative shell flower-a button would work) A flat washer or large flat button (that will fit inside the top of the bell) (a small lid with a hole in the middle would work) Monofilament(fish-line) Technique: Clean, paint and decorate your pot. (Make sure to invert it before decorating) I decoupaged my pot but you can paint yours, cover it in fabric or mosaic? Use your imagination! Make a hole in the bottom of the Jell-O mold (make sure your cord will fit through it) Fold cord in half to form a loop and tie a knot a few inches down to form the hanger. Thread un-looped ends of cord through a large bead, and down through the hole in the terracotta pot. Thread cord ends through washer (or button) and then through the second bead. Tie a knot as close to the bead as possible to tighten everything up. Thread cord ends through the hole in the Jell-O mold and adjust mold to hang down enough so that you can see it, and so it can easily swing to hit the inside of the pot Tie another tight knot to hold it in place. Leave enough cord to form a small loop and tie one last double knot in the cord. Cut off any excess cord Thread a piece of monofilament through the hole in the clapper, and through the loop in the cord. Adjust the clapper so It will hang below the Jell-O mold allowing it to catch the breeze and tie the monofilament in a tight knot to secure. Trim excess. Hang and Enjoy! *(Find my decoupage technique in my July 31st column or contact me at: https://www.facebook.com/HandmadeinEllijay/)
0 Comments
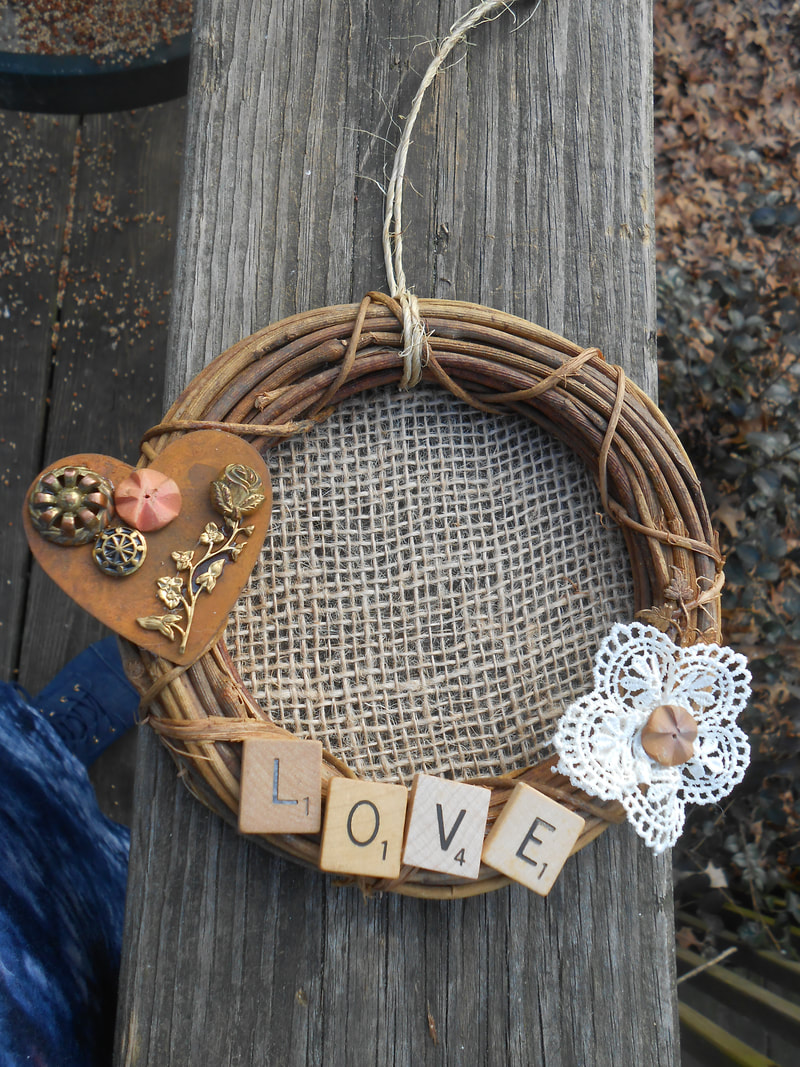
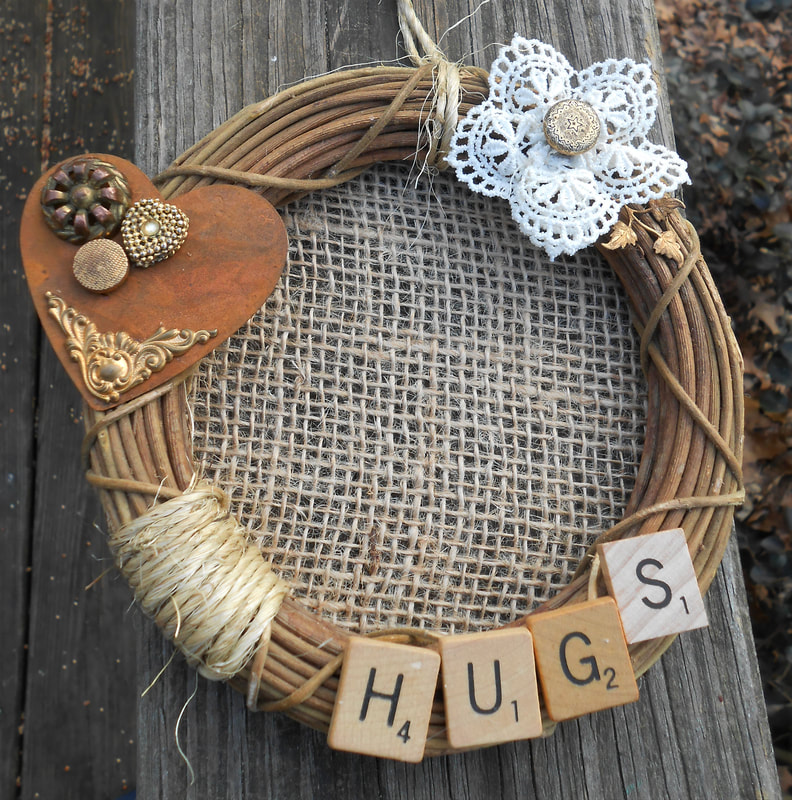
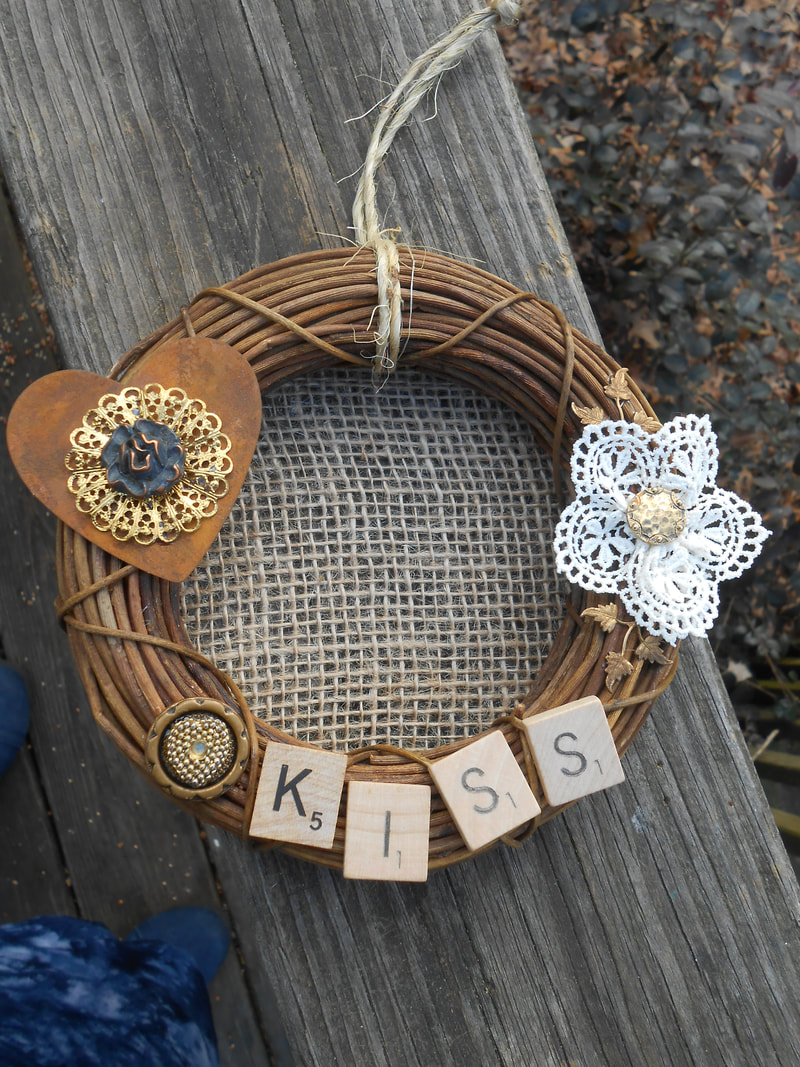
~ Rustic Valentine Wreath ~
A One of a Kind Nancyfangles Design Circles have long been recognized as a symbol of infinity - having no beginning or end. A great example is the wedding band, a sign of never-ending love. It was that symbolism that inspired me to create these rustic valentine wreathes. Pulling my components together I started with traditional valentine trimmings such as hearts and lace. The scrabble pieces reminded me of the nostalgic conversation hearts that came in a box and donned simple messages like “Love you”, “Hugs” and “Kisses” and the vintage buttons and reclaimed jewelry pieces served as the icing on the proverbial valentine cupcake. Although jewelry, flowers, chocolate filled hearts and candy kisses may be customary valentine gifts, these rustic little wreathes will be an endless reminder of your love and will still be around long after the chocolate is gone. Supplies and Instructions: 6” grapevine wreath (or similar) Burlap Twine Lace Vintage buttons Reclaimed jewelry pieces Scrabble pieces E6000 or similar glue (always use glue in well ventilated area) Begin by cutting a piece of twine (approx. 10 inches). Fold it in half and pull the two loose ends around the wreath and back through the folded end pulling tightly to secure. Wrap a piece of twine around the wreath several times to add a decorative accent. Use glue to hold in place. Lay burlap over wreath and cut to size being sure to leave enough overlap to glue into place. Run a line of glue around the back of the wreath and glue the Burlap into place. Let dry. Run a gathering stitch on the bottom of a piece of lace, gather into a flower and knot to secure. Arrange your components onto the wreath until you get a design you like. Glue your pieces on one at a time and set aside to dry. Give to a Loved one or keep for yourself!
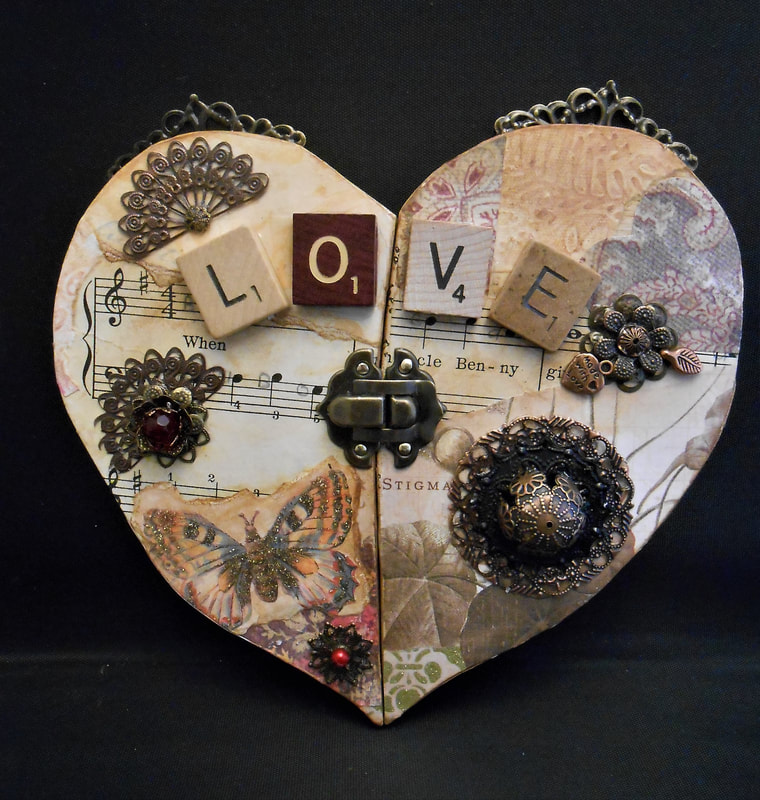
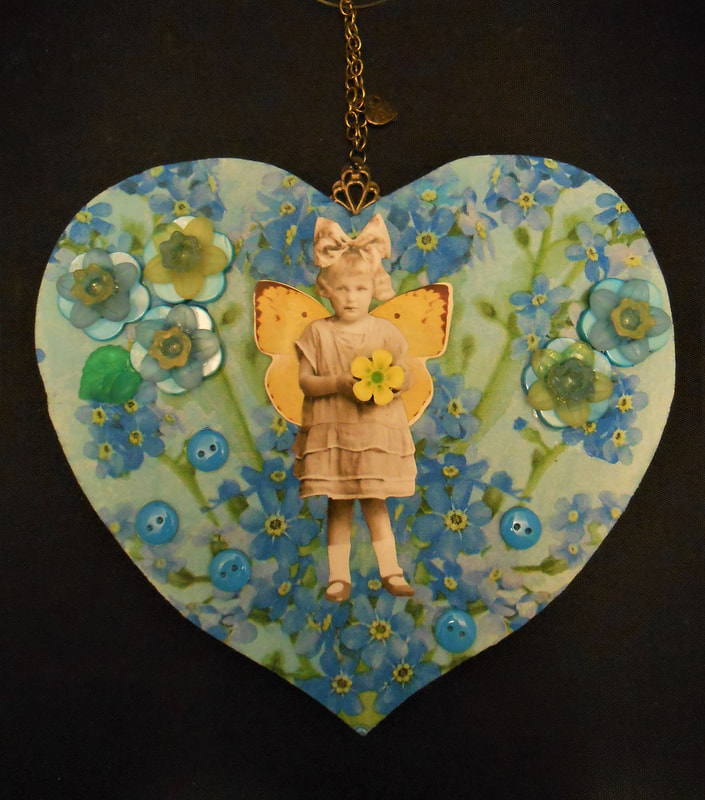
A “Scrap”Happy Valentine ❤ Create your own Keepsake Valentines ❤ A Nancyfangles Whimsical Creation Roses, Candy and Jewelry may be the go to gifts for Valentine’s Day, but these “Scrap”Happy Hearts can say I Love You in a whole new way! Re-purposed from discarded pieces of wood, scraps of papers and decorative napkins, and embellished with buttons, scrabble tiles, jewelry finding and ephemera, these keepsake valentines can be personalized for the one you love. A great gift for your better half, the kids, your siblings or a special friend. I had so much fun creating these, and I hope you will too! Supplies: A Piece of scrap wood(Or find a heart already cut out) A jig saw Sand paper Modpodge Scraps of paper/decorative napkins Embellishments such as; buttons, beads, scrabble tiles, jewelry findings, ephemera, charms E6000 glue (please use in a well ventilated area) Distress stamp pad Technique: I was so excited to receive a jigsaw from my son this Christmas, (thanks Brian) and couldn’t wait to use it! In fact this was my first time ever using one. Luckily my husband had a nice scrap piece of wood that he was willing to share and a few pointers on jigsaw use and safety to pass on (thanks Eric). If you are using a saw, please do so safely, and always wear eye protection. I started by making a heart template. I drew out one half of a heart on a piece of cardboard, folded it in half and cut it out. When I opened it, I had a whole even heart. Then I used the cardboard heart as a stencil to trace around onto the wood. Be sure to draw a dark enough line so you can see it good when cutting. I clamped the wood firmly in place and slowly cut out my design. I sanded the edges to remove any splinters and wiped it down to remove any sawdust. Next I covered my work surface, layed out my papers and embellishments, grabbed the Modpodge and jumped in! I used a thin layer of Modpodge to glue down my main background covering the front and the sides and allowed it to dry completely. Then I decorated each heart using E6000 and a selection of embellishments. I cut one heart in half, (a broken heart) and mended it with a metal buckle. I thought it came out cute. I distressed the broken heart with ink to add a little vintage flair. When everything was completely dry, I came back in and added the hanging hardware (I used jewelry findings to add to the aesthetic of the design). I hope you will give it a try and make a special “Scrap”Happy Heart for your loved ones! 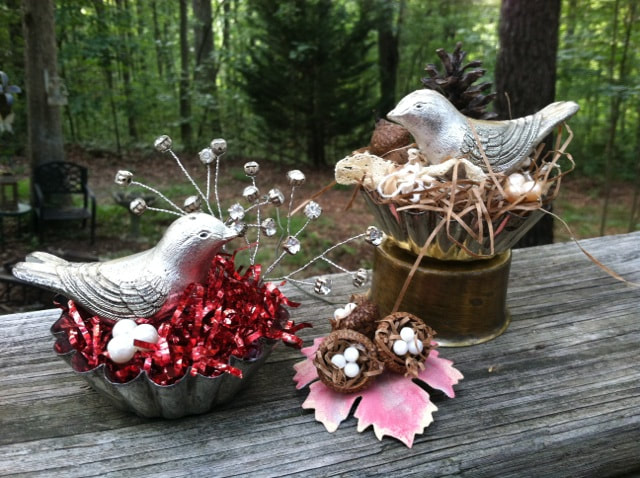 “Nested” A One of a Kind Nancyfangles Design Birds’ nests are a symbol of “Home,” life, family and growth. There is a legend with roots that trace back from Germany, Iceland and Sweden, that to find a birds nest nestled in the branches of your Christmas tree was a sign of good luck and prosperity. These little birds’ nests will add a spark of whimsy to your tree, on a shelf, or as part of a table centerpiece. They are easy to make, and can be made with a variety of materials that you may already have. *Supplies needed for both nests: Baking Tin (small pie pan) Small bird approx. 3 inches (I used vintage salt and pepper shakers) 3 small beads or beans *For the “Nature” inspired nest: Paper shred (natural) or moss Small pieces of string, lace, bric brac… 1 small pine cone 1 acorn *For the “Whimsical” Christmas nest: Mylar shred stems of rhinestone floral spray (use your imagination, you could spray glue a small branch and add glitter) *For the small Acorn nests: 3 Small acorn caps Paper shred tiny beads or beans Technique: (for nature inspired nest) Roll shred up into a ball in your hands (add in lace, string…) Hot glue shred to bottom of baking tin (be careful, tin may get hot) Glue pine cone to side of tin Glue acorn to side of tin, and to pine cone Make a small opening in the middle of the shred and glue bird in Glue beads/beans together using very little glue Glue beads/beans onto shred Follow the same instructions for all the nests as shown in photo. Handmade in Ellijay Column, as published in the Times Courier newspaper (all rights reserved) 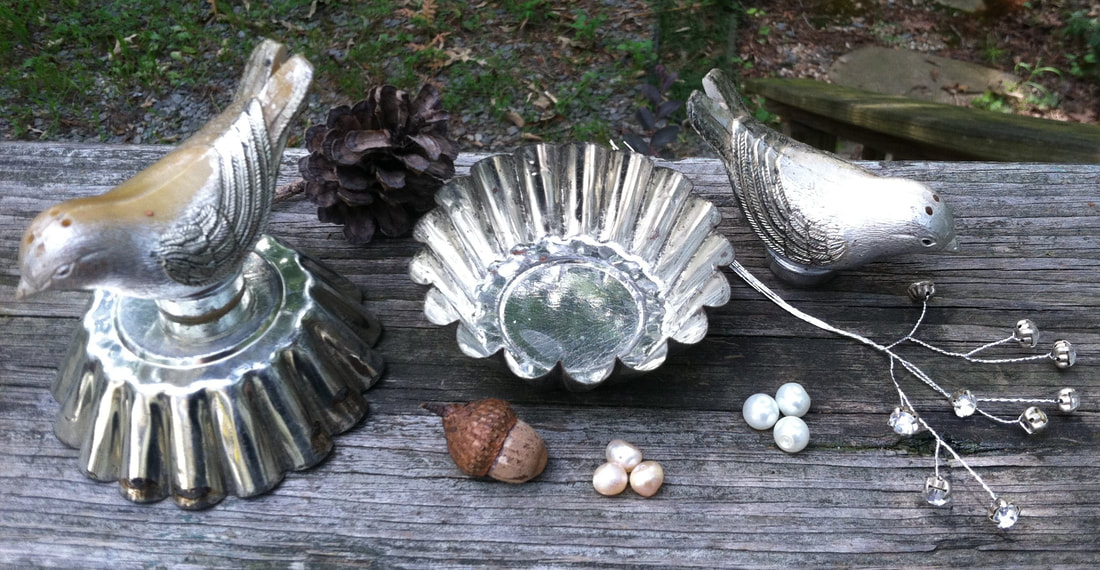
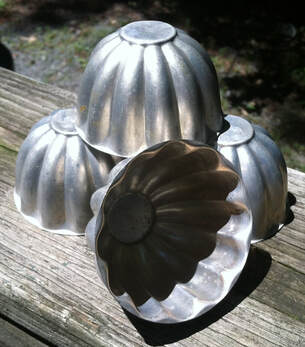
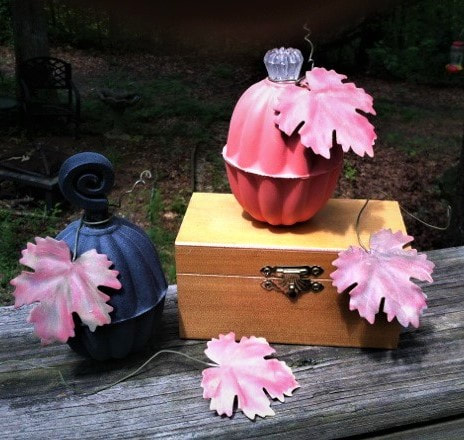
Jell-O Mold Pumpkins:
A Nancyfangles Whimsical Creation Supplies: For Two 4 vintage Jell-O molds A handful of marbles 2 metal leaves (or fabric, paper…) 2 Furniture knobs for stems Rubbing alcohol Glue (E6000 or Super glue) Spray paint (black and orange – or 1 color as you desire) Spray finish (clear drying/satin finish) Rubber stamp ink (paints or paint pens) Instructions: Drill or punch hole into top of 2 Jell-O molds for stem (making sure that the screw on the knobs will fit tightly) Clean Jell-O molds and metal leaves with soap and water and wipe down with alcohol Spray paint Jell-O molds and allow to dry for 24 hours Paint metal leaves as desired. (I used stamp pads) allow to dry Spray on finish and allow to dry Glue on knobs and let dry Put marbles into 2 molds to weight down Glue 2 Jell-O molds together to create top and bottom of pumpkin (be sure to be in a well ventilated area, allow to dry as per glue directions) Wrap leaves around stem, curl as desired to resemble vine Enjoy! This was my first Handmade in Ellijay Column, as published in the Times Courier newspaper Oct. 2017 (all rights reserved) Handmade in Ellijay
By: Nancyfangles In years gone by people used what they had, to create what they needed. Bread was fresh baked with natural ingredients, old feed sacks were repurposed into clothing, and household items were repaired and reused instead of discarded and replaced. There was value in the things we worked so hard to obtain. In these days of disposable incomes and disposable goods there is a resurgence by many to re-make, re-use and re-purpose. For some, it is recycling bottles and cans to keep them out of landfills and help keep our planet green. For others it is saving money for the things we need, by purchasing things somebody else no longer does and for some it is the challenge and the pleasure of re-purposing and re-designing something old, discarded, chipped and worn, and remodeling it into something new, unexpected and unique. For me it is a combination of all of the above, with an emphasis on the Art of… “Transforming time-worn treasures into Whimsical Works of Art”! I invite you to join me on this creative journey! I will be treasure hunting for just the right pieces, household items, broken jewelry, old furniture, fabrics, clothing etc. and sharing my techniques and instructions on how to breathe new life into these hidden treasures. Along the way I welcome your comments, suggestions, questions and ideas, and I would love to hear about your projects and pursuits. You can email me at: nancyfangles@etcmail.com, and follow me on Facebook: https://www.facebook.com/HandmadeinEllijay/ First written 9/24/2017 for publication in The Times Courier newspaper (all rights reserved) |
Archives
September 2023
Categories |
Nancyfangles
 RSS Feed
To book me for your upcoming event, or for more information about me and my art Work, contact me!
A response can be expected within 48 Hours of initial inquiry.